
If you guys read my post, Valentine’s Day for the Socially Anxious, then you are probably wondering why in the hell I would do a full face of makeup for a night in. My answer to this is, in fact, that I did not. I am deceiving you. I actually did this makeup to go to Ulta with my mother-in-law the day before Valentine’s Day. I had also had my hair recolored earlier that day, so I had to see the complete look. I made the grievous error of bleaching my hair last year (1 or 2 shades lighter). Naturally, as the toner faded out the more orange I became. When I could no longer handle the fact that my hair was the color of Trump’s wig, I decided to dye it back to my natural ashy brown.
Since I hadn’t done my makeup in about a week, I figured it was all or nothing. Also, I have an irrational fear of being judged by the Ulta/Sephora employees. Another fun irrational fact about me, I find that they will bother me less with a full face of makeup (probably because I don’t look I just wandered up out of the sewer). This is ideal as I don’t enjoy conversing with strangers.
For this makeup I was going for more soft romantic vibes. I think that most V-day looks on the youtube feature dark sultry smoky eyes. As this was not that kind of affair, glammed up natural was just going to have to do. Natural in that it took me over 20 products to achieve this. I may need to re-evaluate my choices.
To start this look I did prep my skin earlier in the day. I didn’t really do my makeup that morning to get my hair done, so I just washed with my normal face wash and used the Tatcha Water Gel moisturizer, particularly focusing on my under eye area. After taking a nap, I actually started my makeup.
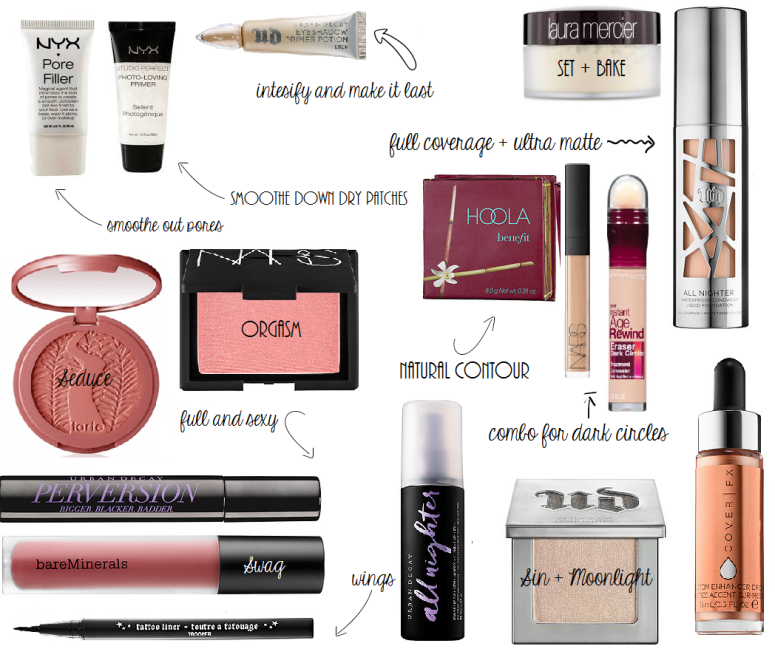
I primed my skin by massaging the NYX Pore Filler around my nose where my pores are most exaggerated. I then followed this by smoothing out any dry patches with the NYX Photo Loving Primer. My trick to priming is to only do this in areas where I absolutely need it. Next, because my skin was being monstrous (and I basically have an acne beard), I used my favorite full coverage foundation. I honestly would have preferred to use my Rainforest of the Sea foundation, but my face needed drastic measures. I worked my All Nighter Foundation onto my skin with a damp beauty blender. I find that a freshly dampened beauty blender works best as this product is super thick and pigmented. One HUGE help with my under eye creasing is that I no long take my foundation up to my under eye. I stop my foundation where I am going to add concealer next. I learned this trick from Wayne Goss via this video on how to stop your under eye texture from coming through. Naturally, the next step is to cover the fact that I have only had four hours of sleep. I start by doing the upside down triangle thing that you have seen a million places with the Maybelline Age Rewind Concealer. I then follow this with a brightening concealer closer to the eye, in this case that was the NARS creamy concealer in Chantilly. I blend it all out using my micro-mini beauty blender, and then I bake/set it all off with my favorite setting powder. I love this one from Laura Mercier as it is finely milled. Lastly for my base, I spray my beauty to blender lightly with setting spray or with my rose water spray and press the setting powder into my skin. This helps the powder melt into my skin (otherwise it just sits there looking crazy).
To add life to my skin a do a whole host of things that would probably classify as extra. One extra optional step is creating a highlighter base under your setting powder. I take the tiniest dot of foundation and a dot of the Cover FX liquid highlighter in Moonlight and dot it along my cheekbones, nose, and cupid’s bow (blend using the micro beauty blender). After it is all set and done (see what I did there?!), I start by doing light contouring with the Hula Bronzer from Benefit. I then take a nude blush (Seduce by Tarte) in a broad area on my cheeks–sometimes I even work it toward my temples (depends on how ghostly I look). I then take Orgasm by NARS, or another peachy pink blush, and pop it just on the apples of my cheeks. Then to be extra extra, I add more highlighter to my cheekbones, nose, cupids bow, and the teeniest bit to my forehead if it looks sad. In this instance I used Sin by Urban Decay, but I have got on the ELF bandwagon lately and their baked highlighters are my jam. I have been using them on the regular.
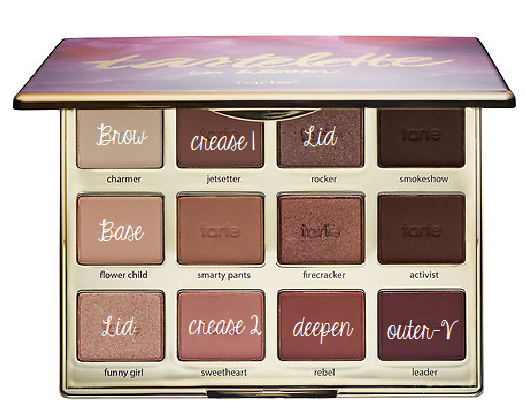
Lastly, I work on my eyes. I know people have strong opinions about doing your eyes first, but I can’t be trusted not to mess up freshly blended eyeshadow with foundation. I start by priming my eyes, I used UD Primer Potion in Eden. Then, I did fill in my brows with a brow pencil. My eyebrow game is not strong, so you don’t want my advice there. For my shadow I used my Tartelette in Bloom Palette. I started by swiping flower child all over the lid to my brow bone. Sometime I even take a little extra on my crease brush and quickly buff a little extra where I am about to put darker colors. Then I took jetsetter and diffused it throughout my crease, blending up and away (creating a fade toward the brow). I repeat this, stopping a little lower, with sweetheart. I take time going back over it to build up a little more pigment. I then lightly start to deepen my crease using rebel. I don’t take this very far up; I stop just above my natural crease. I also only blend this in the outer 2/3 of my eye. To really define my eyes I diffuse leader into my outer-v. I work it into the start of a winged shape, making sure to really buff out the edges (no harsh lines, use your base color to clean up if need be). For my lids I start by taking a packing brush and pat on rocker on the outer half of my lid. I then take funny girl in my inner corner to the middle of my lid, making sure it overlaps with rocker. I then pat out any harsh lines with my pinky finger. Using a pencil brush I take jetsetter under the lower lash line. I also add a bit of rebel to the outer 1/3 of the lower lash line, blending up into the outer-v. Lastly, I swipe charmer under the arch of my brow.
To finish everything off I use any dark grey/charcoal black liner in my upper water line. My favorite is black velvet by UD. I then use any white/champagne eye crayon in my lower water line. I create my winged liner with KatVonD’s Tattoo liner in Trooper. For lashes I do two coats of Perversion by UD. I then set everything off with my favorite setting spray (All Nighter by UD). For lips I use any nude/neutral lip liner (usually one from Colour Pop). I then use my favorite creamy matte liquid lipstick, Bareminerals Matte Liquid Lipstick in Swag. This stuff is amazing because it dries matte, but it doesn’t make your lips feel like they are about to fall off.
 Two-thousand years later, here is the finished look. Thanks for sticking in there with me. I hope this inspires you to do something more creative than this look. Until next time.

You looked beautiful, as you always do. Thanks for going shopping with me. I know I spent 3 times as much as you did, but you really did talk me out of a few purchases … like the make-up brushes. Why buy new make-up brushes when all I need to do with my old ones is wash them? But mostly I had fun just spending time with you!!
LikeLiked by 1 person
I had a blast too! Thank you<3
LikeLike
LOVE THIS LOOK! So soft and feminine, but that fierce wing! ADORBS ❤ ❤
LikeLiked by 1 person